"God saw all that he had made, and it was very good."
- Gen 1:31 (NIV)
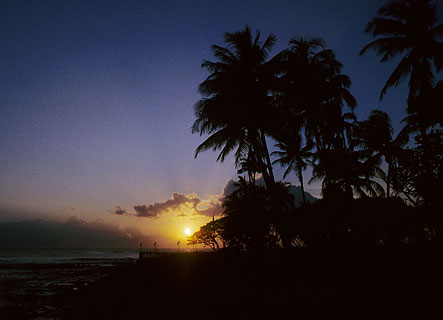
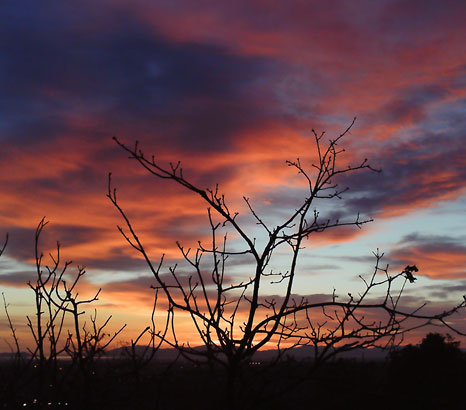
Kauai, Hawaii, 1990
Are you interested in how I get the photographic results I do? You can do it too...here are the basics.
The Most Important Thing
I get my photos by looking for subjects and lighting that I find interesting--that I feel strongly about--and pointing my camera at them. God provides the subject and the lighting (my passion is nature and landscapes), and all I do is the composition of the image.
- 90% of getting great photos is being at the right place at the right time. Landscapes can't be artificially lit, so the only control we have is the framing of the subject and the choice of when we shoot. You'll notice, as you look at my body of work, that I really like colorful sunrises and sunsets.
- Another 9% of it is to shoot a lot, but then only show the best. I feel like I'm doing well to have two or three really good artistic photos a month, out of perhaps 200 shots. I've shot well over 24,000 photos on my cameras, and I've submitted about 100 of the very best to the Pentax Photo Gallery website...and they've accepted seventeen.
- The other 1% is just technical details, which is what all the stuff below is. Necessary for the craft, but only incidental to the art.
- The camera itself is actually less than 1%. Much of this last 1% is HOW to use your camera, more than WHAT camera to use. There are some limitations in cameras, of course, and I discuss them below, but once you have even moderately good tools, the results are up to you, the photographer. Basically, any $150 digital camera today is better than 99% of photographers. So don't sweat it.
Remember, this is art! Express your own God-given creativity and passion in your own way.
When I find something I want to shoot, I take a moment to think about how it looks in the viewfinder, where things are in relation to other things. Often I'll try several different angles and see how each one looks to me later on.
I look at lots of photos other people have taken and think about what I like and don't like about them. See our Links page (scroll down to Photography) for some of my favorites.
Time of day makes a big difference. Midday sun can be harsh and boring (but isn't always!). Dawn and dusk, or cloudy days, often have very appealing light.
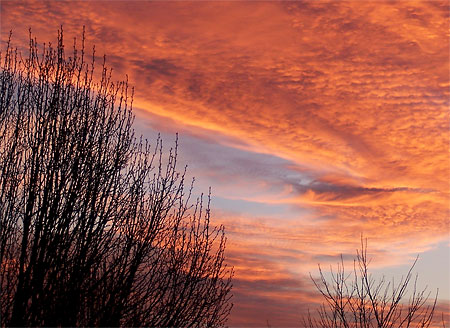
You can make great photos anywhere. It's all in your artistic expression. I've made some of my favorite photos standing in my own yard, like this one, shot one morning from my driveway while we got the kids ready to go to school:
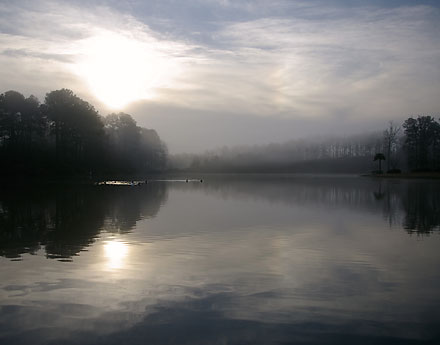
I've been known to take my camera with me when I drive to work on a foggy morning, and stop along the way to shoot, which is how I got this one:
Camera
I have an expensive Pentax digital camera, and had an inexpensive Kodak digital camera (now replaced by a used, inexpensive Fujifilm camera). They have all taken great pictures when I pointed them at great subjects in great light. Many of my favorite photos were taken with the inexpensive Kodak. Whatever camera you have will take great photos for you! I won Second Place in the Georgia State Fair photo contest in the Advanced Scenic category with this photo from the Kodak:
Dan's contest-winning photo, of a sunset in Tel Aviv, Israel, shot with a 4-megapixel Kodak EasyShare DX7440, bought in 2005.
So, what kind of camera should you get? First of all, don't worry about megapixels. The difference between 4 or 6 or 10 megapixels is going to be mostly invisible up through 8x10 or so, and normal people don't care when they look at your photos -- they care about the emotional impact, which comes from subject matter, lighting, and composition. These days, all real cameras have plenty of megapixels.
I liked my 4-megapixel Kodak EasyShare, and now I like my 8-megapixel Fujifilm. Canon makes many good inexpensive digital cameras, too.
It IS possible to get a digital camera that's TOO cheap...I recently found that out the hard way. Here's the story: I was traveling on business to Utah, and I had meant to take a camera to take photos of areas we used to live, and the mountains, and the Great Salt Lake. In the rush of packing, I forgot, so there I was in Utah, with perfect weather, an opportunity to go shoot...and no camera. So, I rationalized to myself, I could buy a really cheap digital camera, shoot photos, and maybe sell it later. Thus, I went to a department store, and found a $59 Polaroid A530.
Understand I intend absolutely no criticism of anyone who has one of these cameras...but I don't recommend it, especially as your primary camera! This cheap little camera does take photos, and they look good on the built-in screen, but they have lousy quality. Details are smeared and very low resolution. I can't make even normal size prints that look good from it.
So, what to do? If you're looking for a very inexpensive camera, please consider spending about $100-150 on a major name brand digital camera (Canon, Nikon, Kodak, Pentax, HP, Sony, Casio, even a better-quality Polaroid, etc.). The extra few dollars go into a much better sensor, even with the same number of pixels, which will give markedly better results.
Or, you can buy used (from reputable camera dealer, such as B&H, Adorama, or KEH...find them with Google). I recently got my very nice little used Fujifilm point and shoot camera from KEH, works perfectly, one minor blemish, 8 megapixels, zoom lens...for $15.00 (+ shipping)!
That said, I still enjoyed my time with the cheap bad little Polaroid, and I can make the photos look decent at web resolution, as illustrated below -- this is the sunset over the Great Salt Lake from the Wasatch National Forest:
Shot with non-recommended $59 Polaroid digital.
One hint: many cameras come with no memory card, or a very small capacity card...so plan to spend about 15 dollars more to get a 8 GB or larger memory card for your camera. Typically that'll give you room for more photos than you can stand.
Mostly I set my cameras on auto-everything. I shoot, and then look at the image on the little screen on the back of the camera. If I like it, good. If not, I change something. Most cameras let you adjust exposure to make it lighter or darker. Minor adjustments are easy later on at your computer.
I use the lowest ISO speed I can, to get the best quality, but I don't hesitate to use a high ISO to get a good shutter speed. A tripod can help a lot, but usually I don't have mine with me...
One trick of mine is to use a warmer-than-normal white balance. Some cameras let you set a "Cloudy" white balance, which can look nicer than the "Auto" or "Daylight" setting, even in normal daylight. I don't worry about literal accuracy of color; I like attractive color. Although, recently, I've taken to making those changes later on, at the computer...
Computer
Computers are a necessary part of digital photography. These days, just about any computer will do.
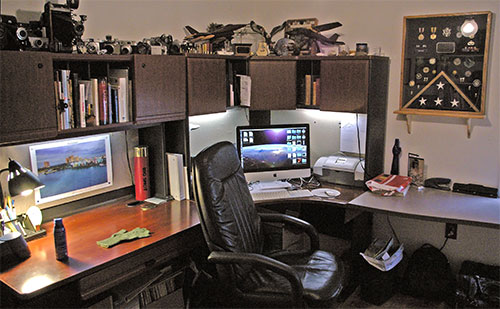
Dan's computer workstation in his home office,.
Software
I use Photoshop Elements. It's about $100, and it does everything I need for high-quality photographs. You don't need the full $700 Photoshop software. Lots of other software can edit your pictures, too. The freebie programs that come with your camera may not give you as much control as you want, though. Try them and see. If you use a Windows computer rather than a Macintosh (my condolences), try Picasa, which is free, simple, photo software that several of our friends like.
Organizing
I copy my images to my computer hard drive through a USB card reader. I rename the image files from the typical (and unhelpful) IMG0034.JPG to something like 2010-02-10_Scout_Camping001.jpg. (I like this format for my filenames, because the images will sort alphabetically in date order.) I have folders for each year (e.g., 2011) and inside them I have folders for each month (e.g., 2010-11 for November). Between my folders and my file names, I can usually find what I'm looking for.
Editing
I edit all my good shots on the computer. (If all you want is snapshots, it's fine to just take your memory card to WalMart, stick it in their machine, and let them print you a stack of 4 x 6's.)
Note: a calibrated monitor is important for color work, but I don't use a real color calibration system. Click here for how I do it if you're interested.
My normal process is to open a photo in Photoshop Elements, and do the following:
- Rotate if needed
- Crop to the composition I want (sometimes I don't need to, but usually I do). I crop to whatever proportions work for that photo...some end up long and thin, others end up square. No hard and fast rules (this is artistic expression, remember).
- Adjust brightness and contrast. (NOTE: If you have an LCD screen, it's likely to be so bright it'll trick you, and your prints will come out too dark, so just be aware of it.) I sometimes use the Levels command, often use the Shadows and Highlights command (but take it easy, this one can get out of hand and look unnatural) and often the Brightness and Contrast command. Often, as I brighten a photo, I find the same increase in contrast looks good, i.e., if you increase brightness by +14, try increasing contrast by +14.
- Adjust the color. Very often I find it looks good to add some warmth. In Elements, try Adjustments > Photo Filter > Warming Filter (81), and move the slider until it looks good. Toggle back and forth between the before and after to see how you like the effect. In other software, you might have a control labelled Temperature, or you can just add some yellow and red. Sometimes I increase the saturation, too, but be careful with this, because it's really easy to overdo.
- Sharpen. I don't use the "Sharpen" command -- it often overdoes the effect. First, view your photo at 100% (or "Actual Pixels"), so you can really see what's happening. Then select Unsharp Mask (a counter-intuitive name, for reasons that don't matter). For my photos, I almost always use Radius of 0.3, Threshold of 2, and then vary the Amount. My inexpensive Kodak camera works well with Amounts of 100-150%, and my Pentax digital SLR often looks really good with about 200-250%. If you overdo it you'll see unnatural bright edges, or "haloes" around objects.
Then I "Save As." and give it a new filename. I like to add an "E" at the end of the original filename to show it's eedited, e.g., 2007-01-06_Allen_basketball10-E.jpg. By saving to a different file name I keep my original untouched for future use.
MAKE BACKUP COPIES! Even as careful as I usually am, I made a mistake a while back, and deleted a bunch of photos I had just shot of Allen earning the Plumbing Merit Badge...now they're gone forever, because I hadn't made backups yet. Remember, digital photos don't really exist, at least until they're printed...they're just ones and zeros in a computer, like any other computer file. My process: I make a second copy right away in a different place on my computer, so I don't accidentally delete them. Then I make another backup on an external hard drive. Then, because we have two computers, I put a fourth copy on the other computer. Only then do I erase and re-use my memory cards. Then, I back up my files to CDs or DVDs about once a month. Two copies, for redundancy. Then I keep one set of CDs/DVDs at home, and one set of CDs and DVDs at my office. You can use extra hard drives, too. As digital cameras become more popular with ordinary families, and they keep their photos only on their hard drive, I'm afraid many people will be disappointed in a few years when their computers die and they lose several years worth of irreplaceable photos.
Now I have a good looking work of art. What to do with it?
Printing
Printing is easy. I copy the image file to a memory card (or you can burn it to a CD), and I take it to WalMart. I put it in their Fuji kiosk machine, pick what I want on the touch screen, and come back later to pick up my prints.
- Hint: Some print machines are just inkjet printers in a box. The ones that give you your prints immediately are like this. When you do the Fuji one-hour photo machine, though, they make a real print on true photo paper (you know, processed in wet chemicals). Look on the back of the print...if it says Fuji Crystal Archive, it's the right stuff.
- Another hint: watch for a choice on the screen to "Auto-Enhance." Turn this off if you edited your own photos to your liking...I missed it a few times, and some of my great sunsets were ruined by being "enhanced." Only use "Auto-Enhance" if you're printing a bunch of snapshots straight from the camera without editing.
I can get pretty good results printing at home on our inkjet printer, too. It's a cheap HP, not a special photo model, and it works fine. You'll need to tell the printer what size to print your photo. You can do this in your editing software, or sometimes in your print command window. Hint: Use printer brand paper (HP in our case) for consistent results, but we cheat and use any photo paper (Kodak, Epson, etc.) Regular paper isn't good enough - get photo paper. You'll thank me!
Web display
Share your art with the rest of us! Here's how:
In my photo editing program, I resize the image to the right display size. Most monitors display at least 800 or 1024 pixels across. So, on my site, I resize to about 500 pixels across. (The Web doesn't care about DPI, only about numbers of pixels.)
I do "Save As," or "Save For Web," and give it a new file name (I put a "W" at the end for "Web"). Then I put it on a web page like you see here. (How to do that, though, is a subject for another time. Feel free to copy my source code if you want!)
This smaller size is good for e-mailing, too.
Have fun!
Ken Rockwell
Ernst Haas
images © 1990, 2005, 2006, 2008 dan bullock
permission granted for non-commercial use